


When a vintage machine stops running because of a single broken gear or bracket, the machine isn't the problem—obsolescence is.
Finding original drawings or replacement parts for antique machinery is nearly impossible. But what if you could digitally clone that broken part, fix it in software, and print a brand-new metal or plastic replacement in hours?
This is the power of reverse engineering 3D scanning combined with additive manufacturing. Below is the complete workflow to resurrect any antique component using the EINSTAR VEGA wireless 3D scanner.
Why Traditional Repair Fails (And 3D Scanning Wins)
Traditional repair requires either machining from scratch (expensive, slow) or hunting for NOS (New Old Stock) parts (rare, expensive). 3D scanning and printing eliminates both problems. You don't need a blueprint. You only need the broken original.
The Closed-Loop Workflow: Step-by-Step
Phase 1: Data Capture (The "Reverse" in Reverse Engineering)

The entire repair hinges on one question: Is your scan accurate enough? For functional parts, 0.1mm error will cause a loose fit.
The Tool: EINSTAR VEGA
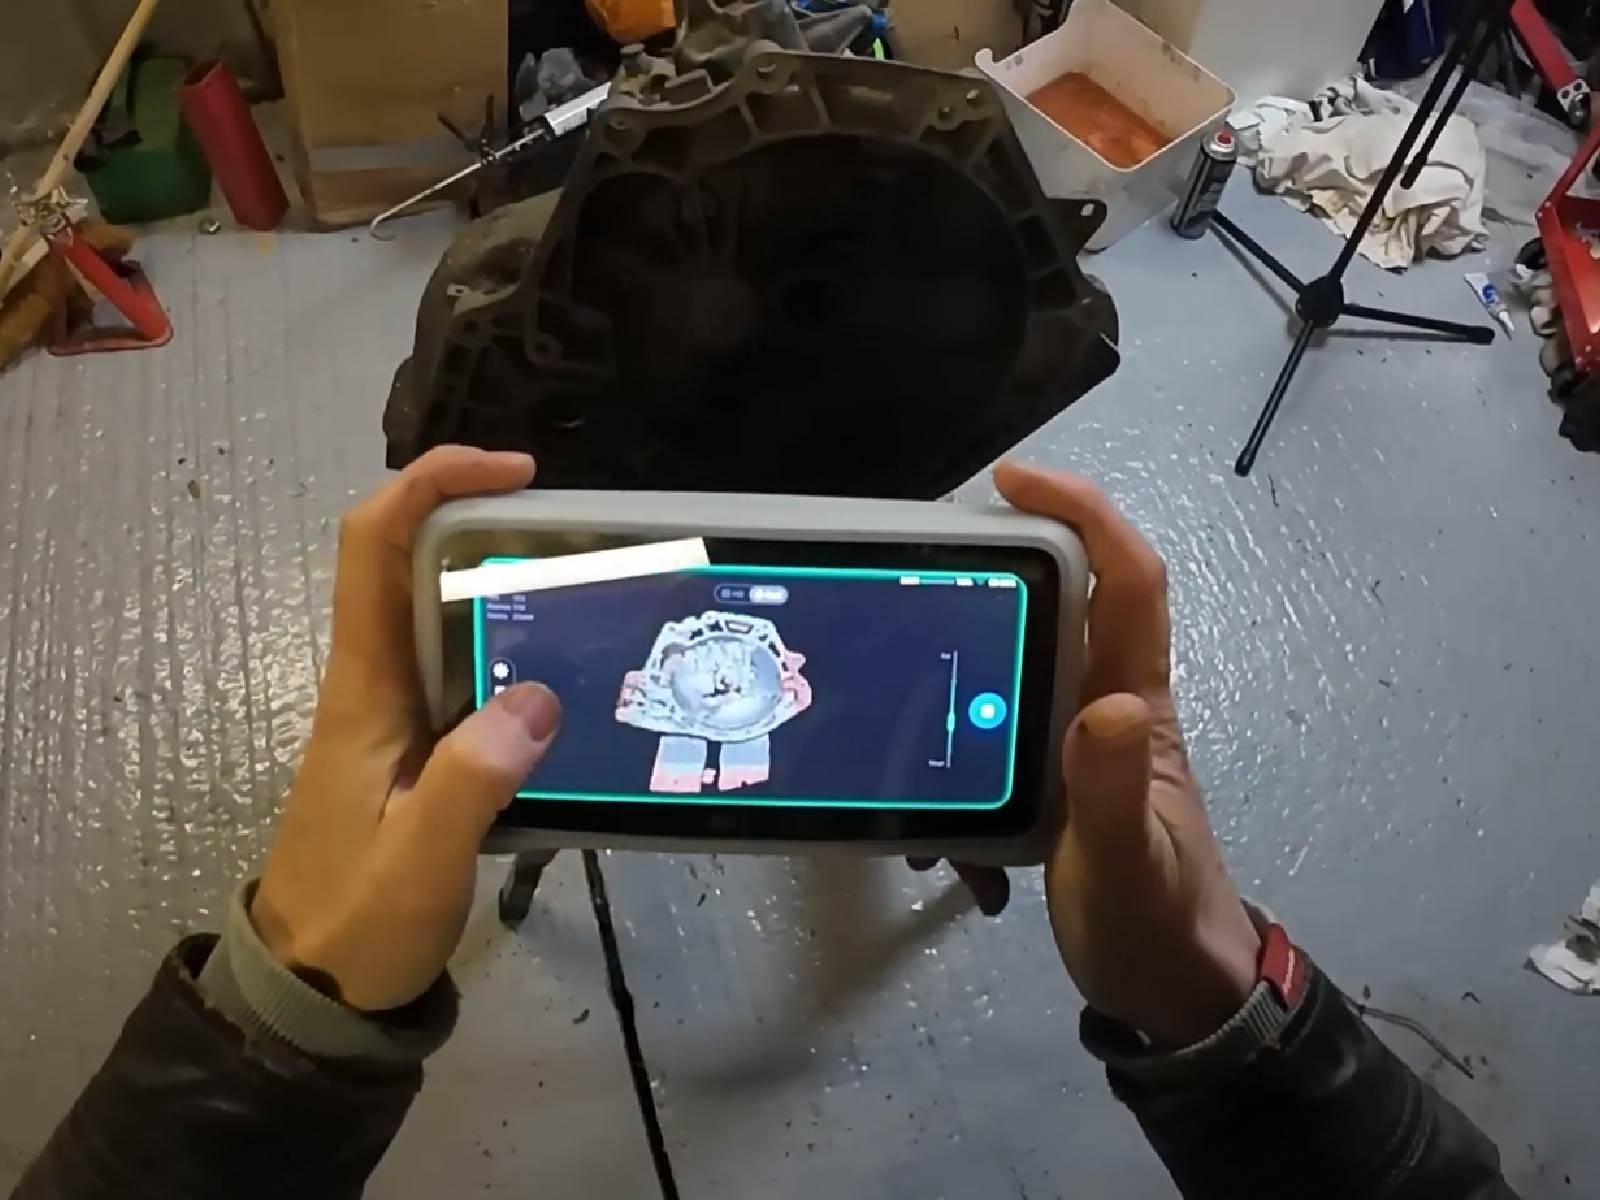
Most hobby scanners require a wired laptop and struggle with shiny, dark, or complex antique geometries. The EINSTAR VEGA is a wireless, all-in-one terminal with a 6.4-inch 2K AMOLED screen—no laptop needed in the field.
How to scan the antique part:
- Prepare the object: Clean the antique part. For shiny metal gears, use scanning spray.
- Select mode: Use the 12mm markers alignment feature. The VEGA supports 12mm markers (40% larger than standard 6mm), reducing setup time on delicate surfaces.
- Capture geometry: Walk around the part. The VEGA’s environmental lighting adaptability helps maintain stable tracking in uneven workshop lighting.
- Utilize "Scanning Rewind": If a mistake happens, you can rewind scan data and correct alignment without restarting.
Phase 2: Mesh Processing (Healing the Broken Part)
Export the raw scan data (STL/OBJ) into reverse engineering software such as Fusion 360, MeshMixer, or Geomagic.
- Auto-detect base plane: The VEGA helps remove base surfaces automatically, reducing manual cleanup time.
- Repair the model: Use mirror, extrusion, or boolean operations to reconstruct missing geometry like broken gear teeth or cracked brackets.
Phase 3: Slicing & Additive Manufacturing
Export the repaired STL and prepare it for 3D printing.
- Form/fit tests: PLA or resin for quick validation.
- Functional parts: Nylon, carbon-fiber filament, or metal printing services for final use.
Phase 4: Validation
Install the printed part. If it fits, the 3D scanning and printing loop is complete. If not, re-scan and compare deviation data.
Case Study: Repairing a 1920s Hand Wheel Bracket
- Scan time with EINSTAR VEGA: 4 minutes (wireless handheld capture)
- Modeling time: 20 minutes in Fusion 360 (using 48MP color texture for reference)
- Print time: 6 hours in PETG
- Result: Perfect fit on first attempt—no machining required
Why the EINSTAR VEGA is Ideal for This Workflow
You cannot reverse engineer what you cannot capture. The EINSTAR VEGA solves three major challenges in antique part restoration:
1. Portability
Fits in a carrying case. Can be used in workshops, barns, junkyards, or museums.
2. Pro-Level Features for Practical Work
- Scanning Rewind for fixing mistakes without restarting
- Auto base plane removal for faster cleanup
- Dual scanning capability for small engravings and large mechanical assemblies
3. Wireless Workflow
Preview models directly on the built-in 6.4-inch screen without needing a laptop connection.
Final Verdict
Stop searching junkyards. Start scanning.
3D scanning and printing for reverse engineering antique parts isn't the future—it’s today’s standard. And the EINSTAR VEGA is one of the most accessible professional-grade gateways to that workflow.
👉 Check the EINSTAR VEGA Wireless 3D Scanner Price & Availability →
Share:
The Ultimate Portable 3D Scanner Buyer’s Guide: Does Weight, Battery, or Wireless Matter Most?
5 Technical Parameters to Check When Buying a Laser 3D Scanner (Don’t Just Look at Resolution)