









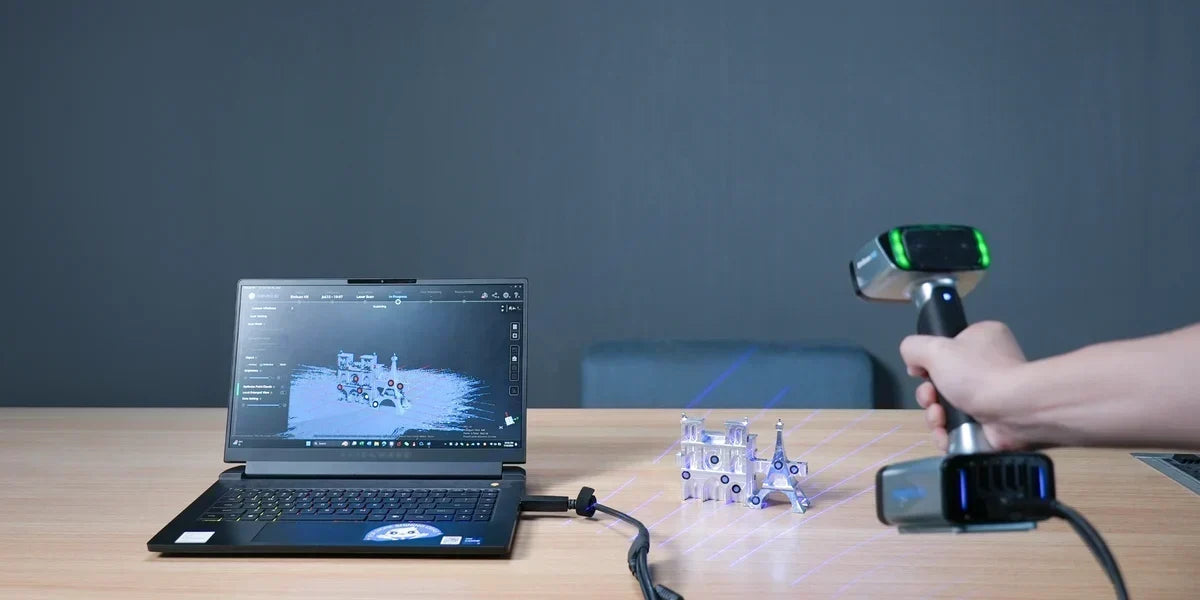
Scanning an object should produce a stable, accurately aligned digital model, but tracking loss, scan drift, and alignment errors can occur when a scanner struggles to recognize enough visual or geometric features. These issues are especially common when working with symmetrical parts, large flat surfaces, repetitive geometries, or feature-poor industrial components.
In these situations, 3D scanning markers provide additional reference points that help the scanner maintain object tracking and preserve scan alignment throughout the capture process. Understanding when markers are necessary—and when they are not—can help users build a more reliable and efficient scanning workflow.

What Are 3D Scanning Markers?
3D scanning markers are reference targets used to help scanners maintain tracking and alignment when scanning objects with limited geometric or visual features.
In a marker-based scanning workflow, small adhesive targets are placed on or around an object before scanning begins. The scanner detects these targets and uses their relative positions as stable references during movement. As new scan data is captured, the system continuously compares the marker locations to maintain spatial awareness and register incoming data correctly.
How Marker-Based Tracking Works
A scanner normally tracks an object by recognizing geometric details, textures, or surface features. When those features are insufficient, the system can lose its position and struggle to align newly captured data with existing scans.
Markers provide identifiable reference points that remain visible from multiple viewpoints. As the scanner moves around the object, it continuously recognizes these targets and calculates its position relative to them. This helps preserve tracking stability and supports more reliable point cloud alignment.
If tracking is interrupted, visible markers can also help the scanner re-establish its coordinate relationship and continue scanning without requiring a complete restart.
Common Types of Scanning Markers
Most scanning markers are circular adhesive targets designed to be easily detected by optical systems. Depending on the scanning technology and application, users may encounter standard printed markers, reflective markers, or coded targets.
Marker size is often selected based on object dimensions and scanning distance. Smaller markers are commonly used on compact components, while larger targets may be easier to detect when scanning large assemblies or maintaining visibility across wider areas.

Why Scans Lose Tracking and Alignment
Not every object provides enough information for reliable 3D scanner tracking. When scanners cannot consistently recognize unique surface characteristics, tracking stability may decline and alignment errors become more likely.
Challenges with Symmetrical Geometry
Symmetrical objects present a common challenge in industrial scanning and reverse engineering. Components such as pipes, cylinders, gears, turbine parts, and rotationally symmetric housings often contain repeating shapes that appear nearly identical from multiple angles.
Without distinctive reference points, the scanner may struggle to determine whether it is viewing a new section of the object or revisiting a previously scanned area. This can lead to incorrect scan registration or overlapping data.
Marker-based scanning helps solve this problem by introducing unique positional references that remain identifiable regardless of surface symmetry.
Low-Feature and Large Surface Areas
Large flat surfaces create a different tracking challenge. Sheet metal panels, machine covers, molded housings, and other featureless surfaces may provide very little geometric variation for the scanner to follow.
Common situations that benefit from markers include:
- Symmetrical parts
- Large flat surfaces
- Repetitive geometries
- Large industrial assemblies
In these cases, markers provide supplemental reference information that supports object tracking and helps maintain consistent alignment across multiple scan passes. This is particularly useful during large object scanning, where long scanning paths increase the risk of accumulated alignment errors.
When Marker-Based Scanning Delivers Better Results
Markers are not required for every project. In fact, many objects can be scanned successfully using geometry or texture tracking alone. However, certain workflows benefit significantly from marker-assisted tracking.
Industrial Parts and Mechanical Components
Industrial components frequently contain characteristics that make tracking difficult. Machined parts, castings, injection-molded components, and polished metal surfaces may have limited texture or highly repetitive geometry.
For reverse engineering workflows, maintaining accurate scan registration is especially important because misalignment can affect downstream CAD reconstruction and measurement processes.
Markers help create reliable reference networks across the object, reducing the likelihood of drift and helping maintain consistent scan registration throughout the capture process.
Large Objects and Multi-Angle Scanning Projects
As scanning projects increase in size, maintaining alignment becomes more challenging. Large equipment, vehicles, industrial installations, and manufacturing assemblies often require multiple scanning positions and extended capture times.
In these scenarios, marker tracking can provide a stable framework that remains recognizable from different viewpoints. This helps connect scan data captured from various angles and reduces the risk of alignment discrepancies when merging datasets.
Marker-assisted workflows are also valuable when scanning environments contain repetitive structures that could otherwise confuse the tracking system.
When You May Not Need Markers
Markers are not always necessary. Many modern 3D scanners can maintain tracking using geometry, texture, or a combination of both. Objects with rich surface detail, distinct geometric features, or sufficient texture can often be scanned successfully without marker-assisted tracking.
Marker-free workflows can reduce preparation time and simplify data capture, especially for consumer products, sculptures, textured surfaces, and other objects that naturally provide enough tracking information. In these situations, markers may add little benefit while increasing setup effort.
The decision ultimately depends on the object's geometry, surface characteristics, and the stability required for the scanning project.
Best Practices for Marker Placement
Successful marker-assisted scanning depends not only on using markers, but also on placing them correctly.
Marker Density and Visibility
Markers should be distributed evenly across the scanning area rather than concentrated in a single location. The goal is to ensure that multiple targets remain visible within the scanner's field of view as the operator moves around the object.

Marker spacing should be appropriate for the object's size and the scanning distance. Small parts often require smaller targets and closer spacing, while larger objects may benefit from larger markers that remain visible from farther away.
To support different applications, EINSTAR Marker Sets are available in 3 mm, 6 mm, 12 mm sizes, allowing users to select marker dimensions that match the scale of the object and scanning environment.
Avoiding Common Placement Errors
Several common mistakes can reduce marker effectiveness:
- Placing markers in straight lines only
- Covering critical inspection features
- Creating large gaps between markers
- Positioning markers where they may detach during scanning
- Applying too few visible targets
Markers should form an irregular distribution pattern whenever possible. This gives the scanner more unique spatial relationships to recognize and improves object tracking reliability throughout the scanning workflow.
EINSTAR Solutions for Stable Marker-Assisted Scanning
Not all marker-assisted projects require the same setup. Small mechanical parts often need closely spaced markers that fit within limited surface areas, while large assemblies may require larger targets that remain visible across wider scanning distances.
To support different scanning scenarios, EINSTAR offers marker sets in 3 mm, 6 mm, and 12 mm sizes. Smaller markers are typically used on compact components, while larger markers are easier to detect when scanning industrial equipment, fixtures, or large objects from multiple viewpoints.

Conclusion
The primary role of 3D scanning markers is not to improve every scan, but to help maintain tracking and alignment when natural features are insufficient. Symmetrical geometry, large flat surfaces, repetitive patterns, and complex industrial projects are among the situations where markers can be especially useful.
For many everyday objects, markers are unnecessary. Choosing between texture tracking, geometry tracking, and marker-assisted workflows depends on the characteristics of the object and the stability required for the project.
FAQ
Can markers be applied to curved or irregular surfaces?
Yes. Markers are commonly used on curved, cylindrical, and irregularly shaped objects. The key is ensuring that the marker remains flat enough to be clearly recognized by the scanner. On highly curved surfaces, smaller markers often conform better and reduce the risk of distortion or partial visibility during scanning.
Can marker-based tracking and texture tracking be used together?
Yes. Many scanning systems can use multiple tracking methods simultaneously. Texture information, geometric features, and markers can complement one another, creating a more robust tracking environment. This hybrid approach is particularly useful when some portions of an object contain rich detail while others are featureless or repetitive.
How can marker residue be removed from delicate surfaces?
Removal methods depend on the material being scanned. In many cases, gently peeling the marker and cleaning the surface with a manufacturer-approved, non-abrasive solution is sufficient. For painted, polished, or sensitive surfaces, testing the cleaning method on an inconspicuous area first helps minimize the risk of cosmetic damage.
Share:
How Can You Capture Better Color Textures in 3D Scanning?